How a biExport for SAC document can be returned or stored
By default, biExport directly returns the generated document tot he end user. Especially when Briefing Books are generated, other output channels are more convient, though. In this post I want to introduce to the Output Channels (also called Publish Modes) that you can use with biExport.
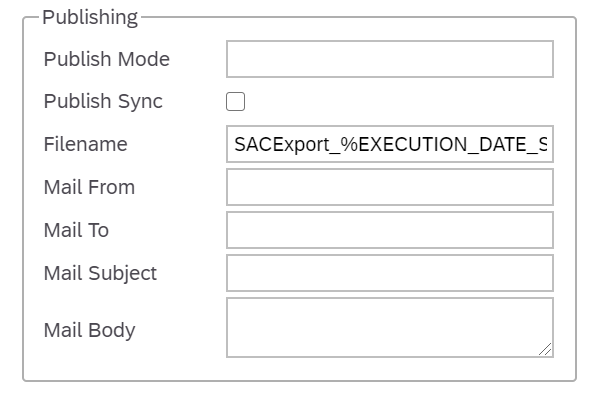
The Filename property determines the name of the export document. The property supports several placeholders:
- Standard placeholders
such as %EXECUTION_DATE_SHORT% (date), %EXECUTION_TIME_SHORT% (time), How a biExport for SAC document can be returned or stored (dashboard title) - Custom placeholders
such as %MYTEXT% that you set viabiExport.addCustomText("MYTEXT","Demo"); - For Briefing Book Generations
URL parameters such as %LOCATION% that are defined in the Analytic Application and passed in the Breifing Book Definition
For all Output Channels but the default, you can choose whether to run the export synchronoulsy or asynchronously via the Publish Sync property:
- Asynchronous exports continue running, eventhough the user navigates away from the application
- Synchronous exports can show error messages on the application
Standard Output Channels
The following standard output channels are available with biExport for SAC (this list is updated on a regular basis):
[empty]
The document is delivered directly to the user’s web client.
The document is delivered via mail.
In separate properties, subject, mail body, the sender address and multiple recipients can be defined.
For support of Information Bursting scenarios, you can assign different mail recipients to individual filter selections.
Note: A SMTP server needs to be configured on the open bi server which is described in the open bi server installation guide.
FILE
The document is stored on the file system. The file system path can be defined with the following script method:
biExport.addCustomParameter("filePath", "myfilepath");
is specified in brackets. Also UNC paths are supported: “//storage/share”.
SHAREPOINT
The document is stored in Microsoft Sharepoint.
The URI of the SharePoint site (e.g. ”http://yoursite.com/sites/Research” and the name of the library (e.g. ” Shared Documents”) must be specified with the following script methods:
biExport.addCustomParameter("site", "mysite");biExport.addCustomParameter("library", "mylibrary");
Optional for authentication:
biExport.addCustomParameter("user", "myuser");<
biExport.addCustomParameter("password", "mypassword");
biExport.addCustomParameter("domain", "mydomain");
FTP
The document can be uploaded to a portal or server for further processing via FTP.
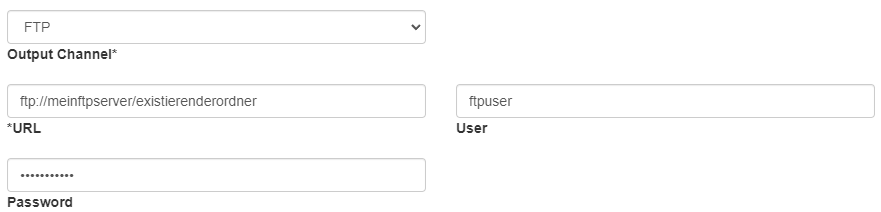
You have to specify the URI of the FTP service (e.g. "ftp://yourftp.com/folder"). Username and password have to be specified in case the FTP service is not set up for anonymous access.
Creating your own Output Channels
The Output Channel required in your project is not in the list? No problem at all!
biExport also makes use of the powerful plugin framework of the openbi platform. You can easily create your own implementation for a custom Output Channel!
Let’s say you want to to publish the export document to a Web Service that was implemented in your project. You have also generated the WSDL of that Web Service.
First of all, you have to define the name of the Output Channel. In my example it is “MY_WEBSERVICE”. We enter this definition for the Publish Mode proptery of the biExport component:

Then, we have to implement the logic for this Output Channel. We will use C# for this.
This is how you access the openbi plugin framework:
namespace com.biexcellence.openbi.export.myWebservice
{
    [OpenBiExportPublisher("MY_WEBSERICE")]
    public class openbiExportMyWebServicePublisher : IOpenBiExportPublisher
    {
        public async Task<string> PublishAsync(openbiExportPublishMode publishMode, IOpenBiExportResult result, openbiExportSettings settings, CancellationToken cancellationToken)
        {

        }
    }
}
You also have to add a reference to com.biexcellence.openbi.export.base, which provides the interface IOpenBiExportPublisher and some other methods that will become very handy for your implementation: For example access to the tracing framework and the all export settings of the Export request!
The custom publishing code will be included in method PublishAsync. You can do practically everything you want there. Just two pieces of advice:
This is how to access the Export document:
FILE Name:
Path.GetFileNameWithoutExtension(result.FileName);
FILE Extension:
Path.GetExtension(result.FileName);
FILE Content:
result.Stream.Position = 0;
MemoryStream memoryStream;
if (result.Stream is MemoryStream stream) {
    memoryStream = stream;
} else {
    memoryStream = new MemoryStream();
    await result.Stream.CopyToAsync(memoryStream);
}
This is how to pass your own custom parameters
You can use method addCustomParameter(name, value) of the biExport Widget to pass your own parameters to the publisher:
biExport.addCustomParameter("WS_SUBJECT", "My dynamic subject");
Then you can access these parameters in your custom publisher code:
if (settings.CustomParameters.ContainsKey("WS_SUBJECT")) {
    requestType.Subject = settings.CustomParameters["WS_SUBJECT"];
}

Creation date: 05.06.2020
Category: Scheduling & Broadcasting
back to overview